Realtime Modulation Functions
You can use various MIDI messages (such as note number, velocity, aftertouch, or
pitch-bend, etc.) to simultaneously control up to two parameters in the MidiVerb 4,
such as delay time, room size, etc. Modulation functions are “hard-wired” in each
Configuration, and therefore cannot be changed. However, you can select which two
types of MIDI messages will act as the modulation sources, and you can adjust how
much they will affect the MidiVerb 4’s parameters by either a positive or negative
amount.
The two parameters in each Configuration which can be modulated via MIDI have
been chosen very carefully to provide the most-desired modulation combinations.
The two modulation sources are designated as Modulator X and Modulator Y. In the
Utility mode, you can select the type of MIDI message which will be designated as
each Modulator. The parameters that Modulators X and Y control are determined by
the selected Program’s Configuration. Example: If using any of the Stereo Reverb
Configurations, Modulator X controls the Reverb’s decay time, while Modulator Y
controls the Reverb’s wet/dry mix.
Keep in mind that both Modulator X and Y can be assigned to the same MIDI
message. Therefore, a single MIDI source can modulate two different parameters
simultaneously.
Defining the Modulation Sources
To select which type of MIDI messages will be used as Modulators X and Y:
Press [UTIL].
The [UTIL] button will light .
Press the [EDIT/PAGE] button until page 4 is selected.
The display will look like this:
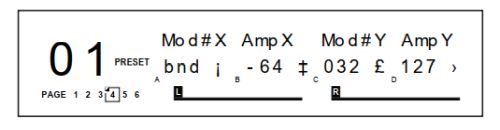 Press the [A] button to select the Modulator X field, and turn the [VALUE] knob
to select the type of MIDI message that will be used by Modulator X.
You can choose from: pitch-bend (bnd), aftertouch (AFt), note number (not), velocity
(UEL), or a controller number from 000–119.
Press the [B] button to select the Amplitude X field, and turn the [VALUE] knob
to set the amount of control Modulator X will have over the parameters it
controls.
This can be set anywhere from -99 to +99.
Repeat steps ➂ and ➃, substituting buttons [A] and [B] with buttons [C] and [D]
to select the type of MIDI message for Modulator Y and adjust its amplitude.
Press the [A] button to select the Modulator X field, and turn the [VALUE] knob
to select the type of MIDI message that will be used by Modulator X.
You can choose from: pitch-bend (bnd), aftertouch (AFt), note number (not), velocity
(UEL), or a controller number from 000–119.
Press the [B] button to select the Amplitude X field, and turn the [VALUE] knob
to set the amount of control Modulator X will have over the parameters it
controls.
This can be set anywhere from -99 to +99.
Repeat steps ➂ and ➃, substituting buttons [A] and [B] with buttons [C] and [D]
to select the type of MIDI message for Modulator Y and adjust its amplitude.
Modulation Parameters Index
The following is a chart describing which parameters of each Configuration are
controlled by Modulators X and Y. Use this chart to determine what control
possibilities exist for each Program.
Configuration Mod X Mod Y
CONCERT HALL Decay Wet/Dry Mix
REAL ROOM Decay Wet/Dry Mix
AMBIENCE Decay Wet/Dry Mix
PLATE REVERB Decay Wet/Dry Mix
NONLINEAR Decay Wet/Dry Mix
MONO DELAY Feedback Wet/Dry Mix
STEREO DELAY Feedback Wet/Dry Mix
PING PONG DELAY Feedback Wet/Dry Mix
MULTI TAP DELAY Master Feedback Wet/Dry Mix
BPM MONO DELAY Feedback Wet/Dry Mix
DELAY:DELAY Delay 1 Feedback Delay 2 Feedback
STEREO CHORUS Wet/Dry Mix Depth*
QUAD CHORUS Wet/Dry Mix Depth*
CHORUS:CHORUS Chorus 1 Wet/Dry Mix Chorus 2 Wet/Dry Mix
STEREO FLANGE Wet/Dry Mix Depth*
FLANGE:FLANGE Flange 1 Wet/Dry Mix Flange 2 Wet/Dry Mix
LEZLIE->ROOM Speed (slow/fast) Motor (on/off)
STEREOPITCHSHFT (none) (none)
PITCH:PITCH (none) (none)
AUTO PAN (none) (none)
DELAY->REALROOM Delay Feedback Reverb Decay
CHORUS->REALROOM Chorus Wet/Dry Mix Reverb Decay
FLANGE->REALROOM Flange Wet/Dry Mix Reverb Decay
REALROOM->FLANGE Reverb Decay Flange Wet/Dry Mix
CHORUS->DLY->ROOM Chorus Wet/Dry Mix Reverb Decay
FLANGE->DLY->ROOM Flange Wet/Dry Mix Reverb Decay
REALROOM+DELAY Reverb Decay Delay Feedback
REALROOM+CHORUS Reverb Decay Chorus Depth
REALROOM+FLANGE Reverb Decay Flange Depth
CHORUS:DELAY Chorus Wet/Dry Mix Delay Feedback
FLANGE:DELAY Flange Wet/Dry Mix Delay Feedback
PITCH:DELAY (none) Delay Feedback
* Note: If audio is going through a chorus effect and the depth parameter is changed,
you will notice audible “clicks”. This is due to the fact that the processor is making
significant changes in the effect’s algorithm. We recommend that you change the
setting of this parameter only while no audio is running through the effect.
Setting Modulation Amplitude
Once you have selected which MIDI messages are to be designated as Modulators X
and Y, you may then indicate their strength (or how much control they will have
over the effect parameters) and in which direction (positive or negative). The
amplitude range for both Modulators is -99 to +99. If you chose an amplitude of +99,
the Modulator will have full positive control over the parameter it is modulating. But
what does this mean to you? Let’s take a look at some examples.Chapter 6 – Advanced Applications
62 MidiVerb 4 Reference Manual
Let’s say you want your keyboard’s modulation wheel (controller #1) to control how
much reverb is heard. Since Mod Y is wired to the Wet/Dry Mix, you would first
assign Mod Y to be 001. Next, you set the amplitude for how much of the Mix
parameter’s range you wish to be able to control from the mod wheel. For full
control, set the AmpX to 99. At this point you may not hear any effect. This is
probably because the effect’s Mix parameter is set to 100%; the mod wheel is adding
to the parameter’s value, but it has nowhere to go. If you bring the Mix parameter all
the way down to 0%, the mod wheel will have total control (move the mod wheel all
the way up and down to move the Mix parameter from dry only to wet only).
If you are using an effect whose modulated parameters are of the either/or kind (like
the Lezlie’s Speed parameter; it is either slow or fast), the Modulator will have no
effect if the parameter is set to its “second” setting and the Modulator’s amplitude is
set to a positive value. Once again, this parameter is already at its maximum setting
and cannot go any further. Likewise, you will not hear any effect if the parameter is
at its first or minimum setting, and the Modulator’s amplitude is set to a negative
value.
Here’s another example. Let’s say an effect parameter (which is controlled by Modulator X) is
set to 75% of its maximum setting. If Modulator X has an amplitude of 100% and the controller
designated as Modulator X is at 100%, the effect parameter will be at its maximum setting.
If Modulator X’s amplitude is 50%, the parameter will be halfway between its programmed setting
of 75% and its maximum setting of 100%. If, on the other hand, Modulator X’s amplitude is -99,
the parameter will be at its minimum or 0% setting.
Press [B] to select the MIDI Channel parameter. The current MIDI Channel value will be flashing to indicate it is now selected for editing. In the example above, the MIDI channel is set to 01. Turn the [VALUE] knob to set the MIDI Channel to either 01 through 16, or 00 for Omni mode (receives on all 16 channels simultaneously).
